2D axisymmetric pile generator
The axisymmetric generator builds a planar r–z section that numgeo rotates about the pile axis. For an axially loaded pile in horizontally layered soil this gives the same answer as a 3D model at a fraction of the cost, because a two-dimensional mesh represents the full three-dimensional body.
It is not suitable for anything that breaks the symmetry — lateral load, a moment at the pile head, an inclined soil layer. Those need the 3D monopile generator.
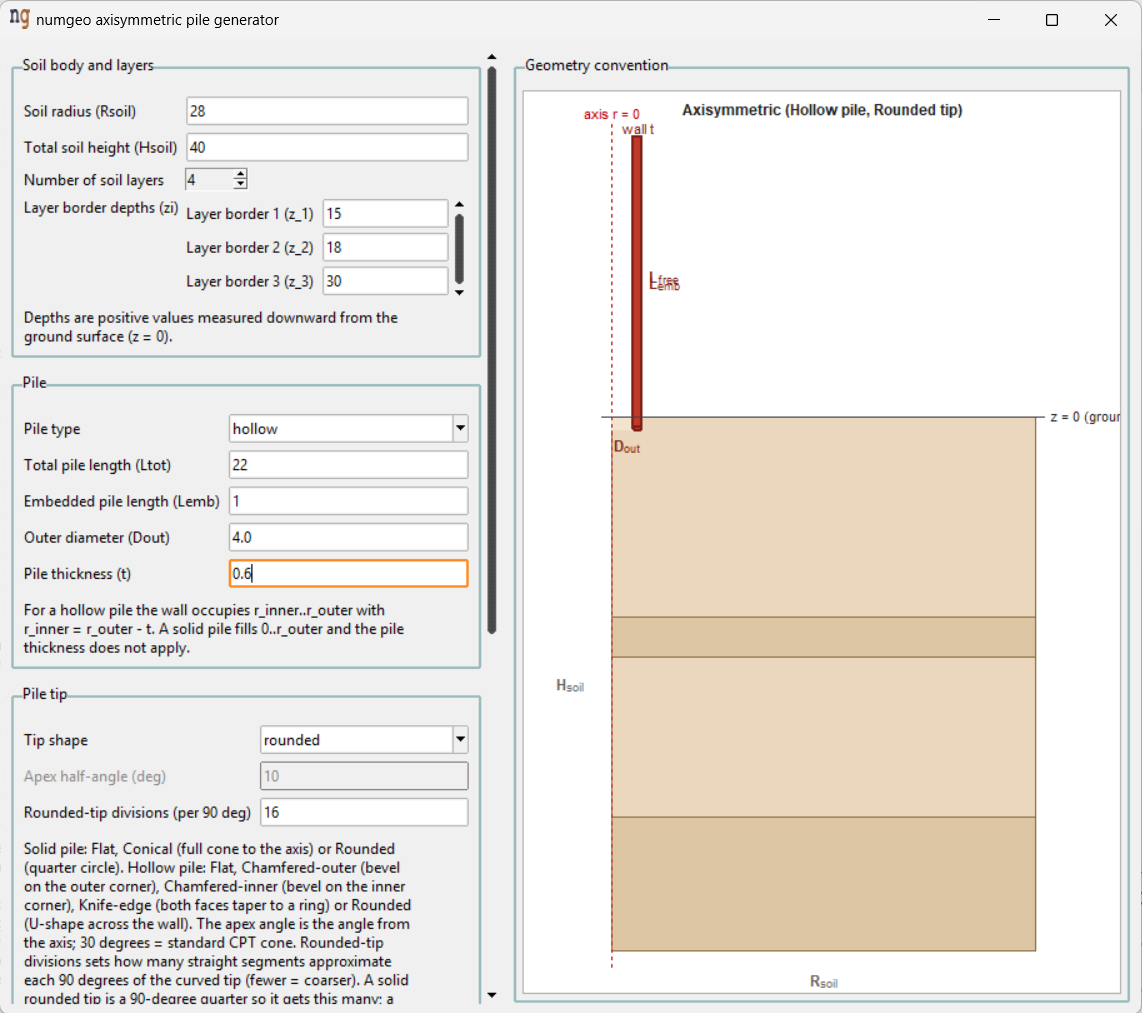
Soil body and layers
| Field | Default | Meaning |
|---|---|---|
| Soil radius | 20.0 |
Radial extent of the model from the pile axis |
| Soil depth | 30.0 |
Depth of the soil below the ground surface |
| Number of soil layers | 1 |
How many layers the soil is divided into |
| Layer border depths (zi) | Depth of each boundary between layers |
Layer borders are positive depths measured downward from the ground surface, one field per boundary, exactly as in the 3D generator.
The radius has to be large enough that the outer boundary does not influence the pile. A radius many times the pile diameter is usual; the generated model can be checked by looking at whether the stresses have decayed before reaching the boundary.
Pile
| Field | Default | Meaning |
|---|---|---|
| Pile total length | 16.0 |
Full length of the pile |
| Pile embedded length | 2.0 |
Length below the ground surface |
| Pile outer diameter | 4.0 |
Outer diameter |
| Wall thickness | 0.25 |
Thickness of the wall, for a hollow pile |
| Pile type | hollow |
hollow or solid |
A solid pile ignores the wall thickness. A hollow pile is described by its outer diameter and wall thickness rather than by inner and outer diameters as in the 3D generator.
Pile tip
The shape of the tip governs how the pile penetrates and how the soil flows around it, which matters for installation and for base resistance.
| Field | Default | Meaning |
|---|---|---|
| Tip shape | flat |
The geometry of the pile toe |
| Apex half-angle (deg) | 30.0 |
Half-angle of a pointed tip |
| Rounded-tip divisions (per 90 deg) | 16 |
Segments used to approximate a rounded tip |
| Tip shape | Description |
|---|---|
| flat | A square-ended tip |
| conical | A symmetric point |
| chamfered-outer | Bevelled on the outside face |
| chamfered-inner | Bevelled on the inside face |
| knife-edge | Tapered to an edge |
| rounded | A curved toe |
Apex half-angle applies to the four pointed shapes — conical, both chamfers and knife-edge — and is greyed out otherwise. A smaller angle gives a sharper tip.
Rounded-tip divisions applies only to the rounded shape. It sets how many straight segments approximate each 90 degrees of arc, so a higher number gives a smoother toe at the cost of more elements.
Zipper extension
Add zipper extension below the pile tip adds a narrow strip of geometry running downward from the tip.
| Field | Default | Meaning |
|---|---|---|
| Thickness (% of pile thickness) | 1.0 |
Width of the strip, as a percentage of the pile wall thickness |
| Length mode | whole_model |
How far the strip extends |
| Prescribed depth (m) | 1.0 |
The depth, when the length mode is not the whole model |
A zipper is a pre-formed path along which the mesh can separate as the pile advances, so that the soil opens ahead of the tip rather than the elements around it distorting. It matters for installation analyses, where the pile moves a long way through the mesh; it is not needed for a pile that is wished in place and then loaded.
Length mode is whole_model to run the strip to the bottom of the soil, or
a prescribed depth for a shorter one.
Geometry convention
The sketch beside the fields is drawn from the values entered and updates as
they change. It marks the ground surface at z = 0, the soil radius and depth,
the layer borders, and the tip geometry.
Creating the model
Create / replace geometry generates the model, with Delete previously generated geometry first ticked by default so that adjusting a value and generating again is safe. Delete generated geometry removes what the generator made without creating anything new.
Note
The generated groups are a starting point. Further groups can be created in the layers and groups window for anything the model needs, and the generated groups can be edited like any other.